
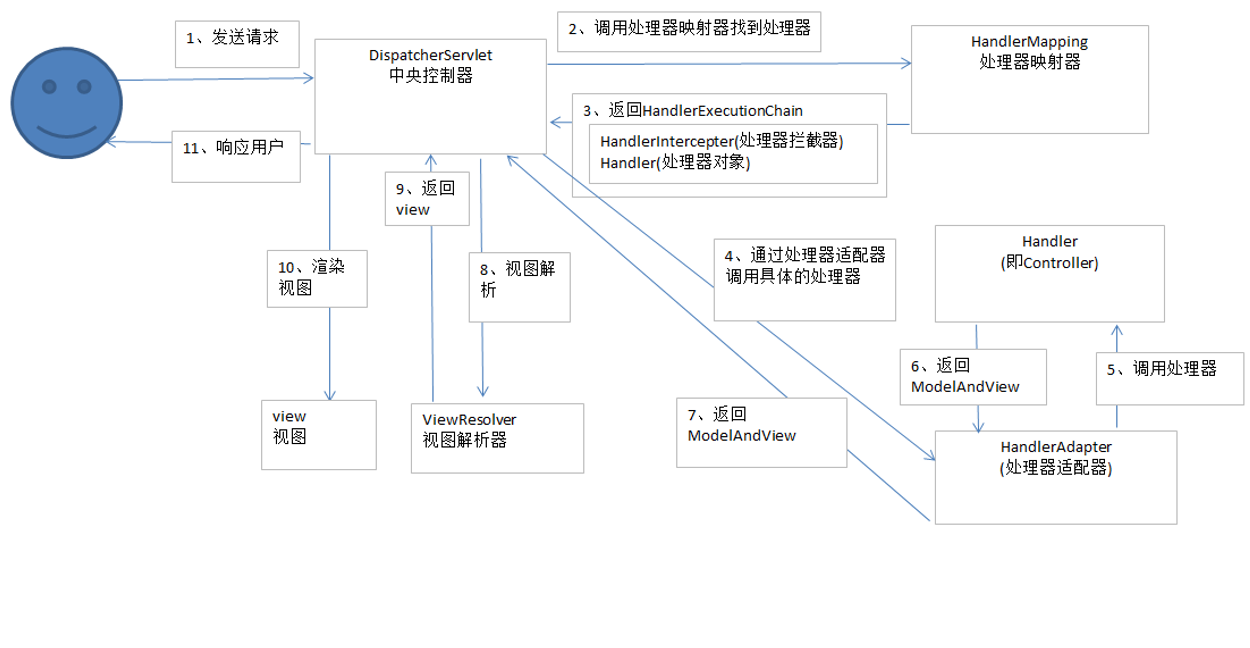
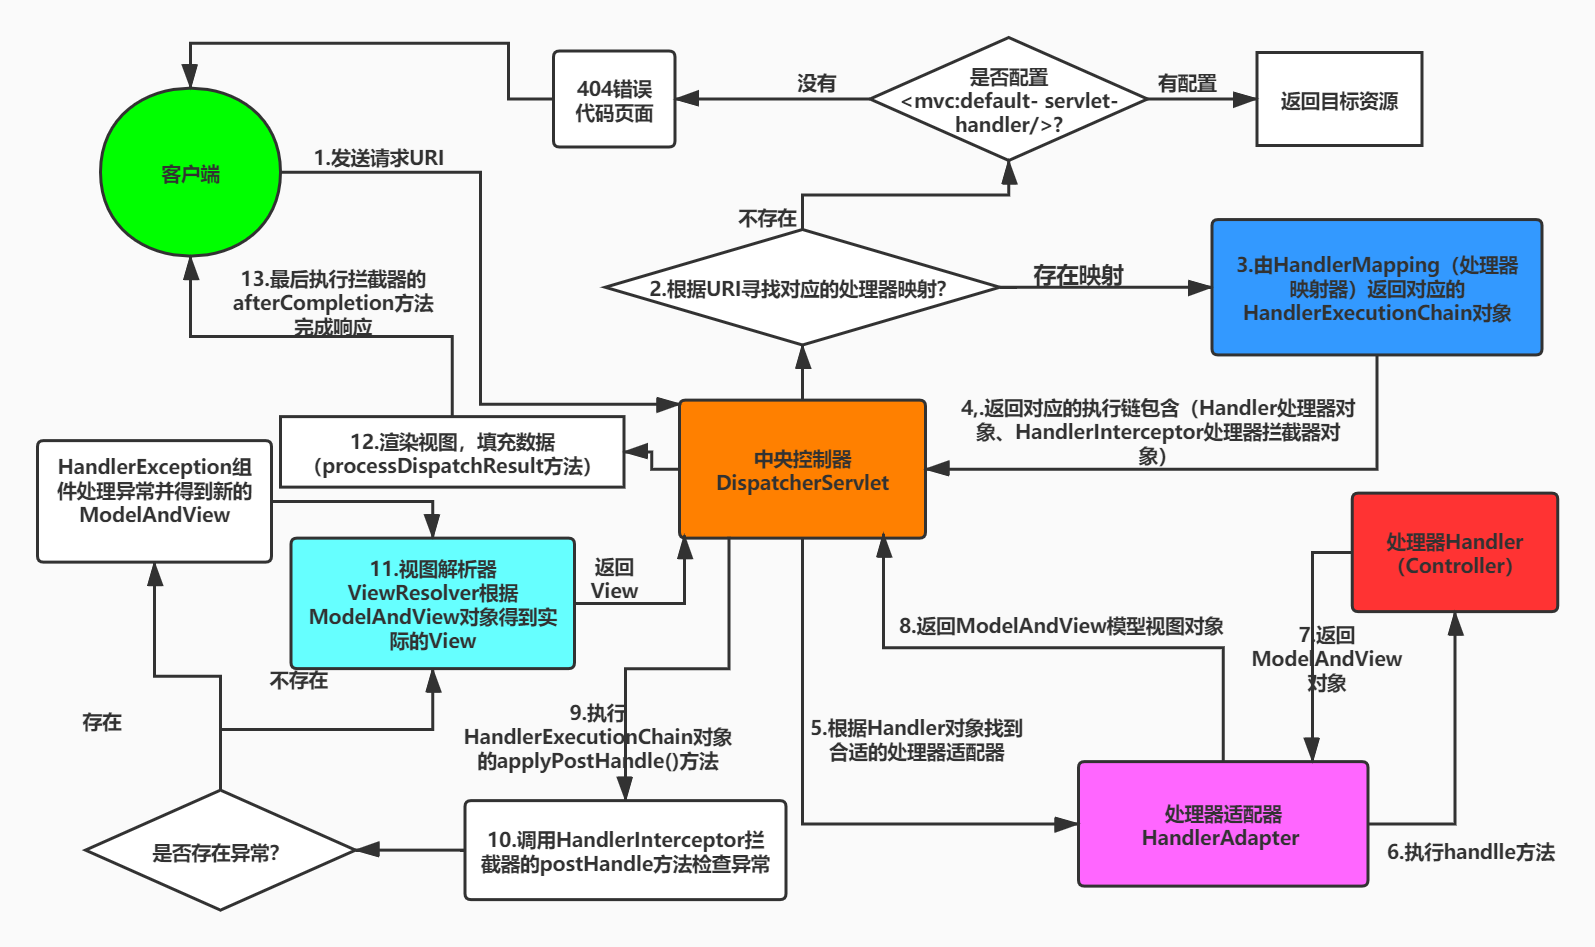
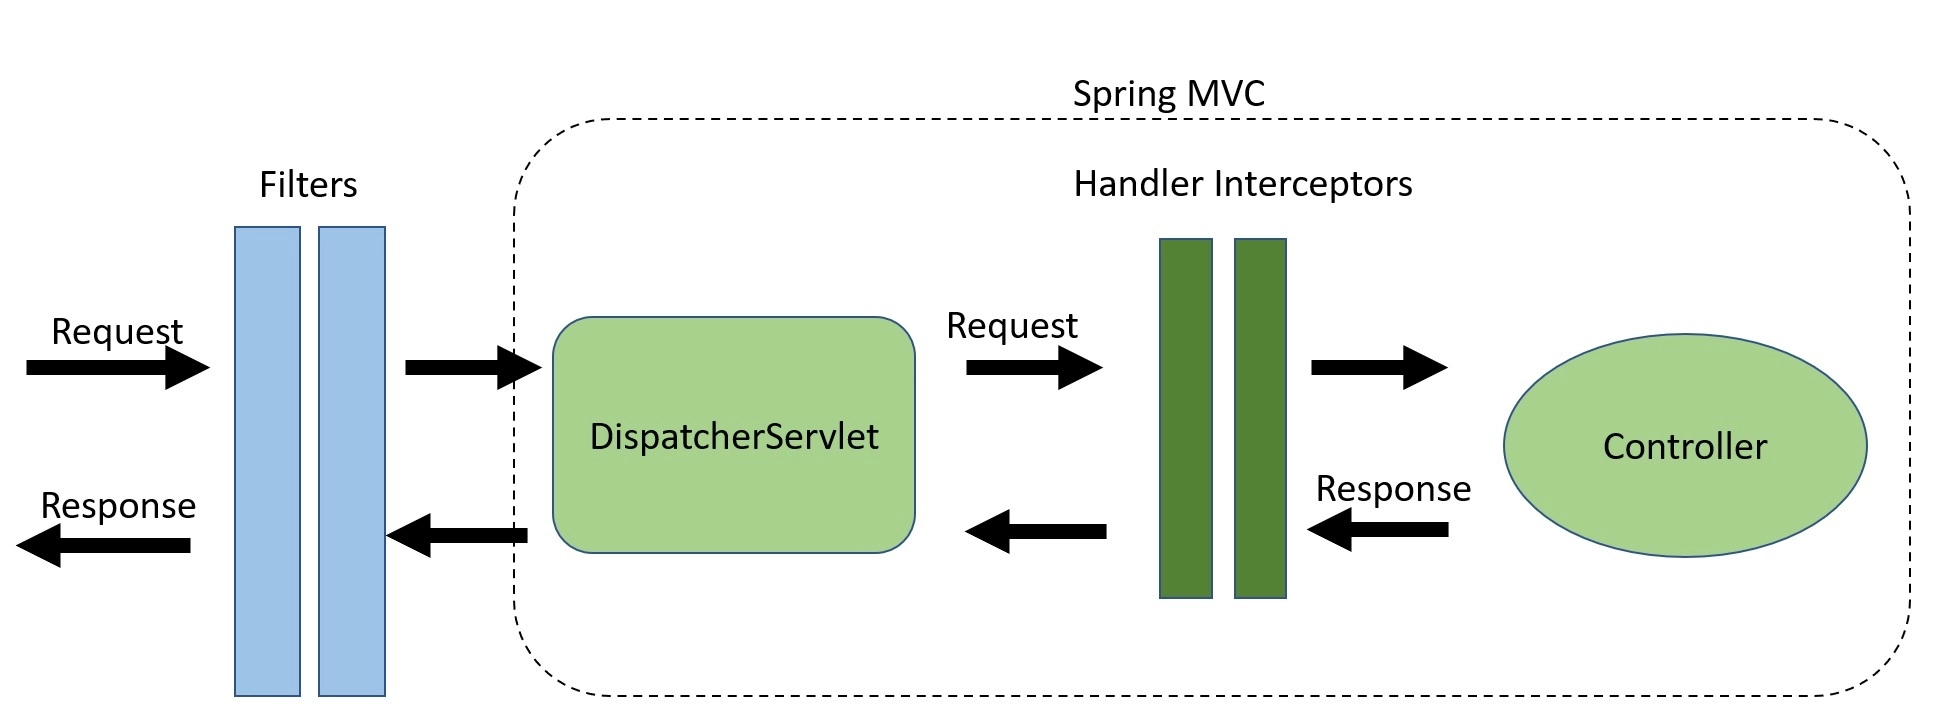
Spring MVC 的中央控制器是 DispatcherServlet;应用控制器拆分为处理器映射器 HandlerMapping 进行处理器管理 和 视图解析器 ViewResolver 进行视图管理。提供了强大的约定大于配置的契约式编程支持。
请求流程
- 用户发起请求,请求被SpringMVC中央控制器(
DispatherServlet)捕获
- 中央控制器(DispatherServlet)解析URL获取请求的URI,根据URI调用处理器映射器
HandlerMapping
- 中央控制器(DispatherServlet)获得返回的
HandlerExecutionChain (包括 Handler 对象和Handler对象对应的拦截器 HandlerIntercepter)
- 中央控制器(DispatherServlet)根据获得的
HandlerExecutionChain 选择一个合适的 HandlerAdapter (如果成功获得 HandlerAdapter 后,此时将开始执行拦截器的 preHanlder() 方法)
HanlderAdapter 根据请求的 Handler 适配并执行对应的 Handler; HandlerAdapter 提取 Request 中的模型数据,填充 Handler 入参,开始执行 Handler(Controller) 。在填充Hanlder的入参过程中,根据配置Spring将做一些额外的工作。HttpMessageConveter 将请求消息(如Json、xml等数据)转换成一个对象,将对象转换为指定的响应信息。
- 数据转换:对请求消息进行数据转换,如 String 转换成 Integer、 Double 等数据格式。
- 数据格式化:如将字符串转换成数字或日前
- 数据验证:验证数据的有效性(长度、格式等),验证结果存储到 BindingResult 或 Error 中。
Hnadler 执行完毕,返回一个 ModelAndView 对象给 HandlerAdapterHandlerAdapter 适配器将执行结果 ModelAndView 返回给 中央控制器(DispatherServlet)- 中央控制器(DispatherServlet)接收到
ModelAndView 后,请求对应的视图解析器 ViewResolver
- 视图解析器
ViewResolver 解析 ModelAndView 后返回对应的视图 View
- 渲染视图并返回渲染后的视图给中央控制器(DispatherServlet)
- 中央控制器(DispatherServlet)将渲染后的页面响应给用户或客户端
环境搭建
开发环境
Idea + Maven + Jdk1.8 + Jetty
创建工程
添加依赖包
修改pom.xml中Jdk版本为1.8
pom.xml1
2
3
4
5
| <properties>
<project.build.sourceEncoding>UTF-8</project.build.sourceEncoding>
<maven.compiler.source>1.8</maven.compiler.source>
<maven.compiler.target>1.8</maven.compiler.target>
</properties>
|
添加依赖包
- spring-web
- spring-webmvc
- javax.servlet-api
pom.xml1
2
3
4
5
6
7
8
9
10
11
12
13
14
15
16
17
18
19
20
21
22
23
| <dependencies>
<dependency>
<groupId>junit</groupId>
<artifactId>junit</artifactId>
<version>4.11</version>
<scope>test</scope>
</dependency>
<dependency>
<groupId>org.springframework</groupId>
<artifactId>spring-web</artifactId>
<version>5.3.18</version>
</dependency>
<dependency>
<groupId>org.springframework</groupId>
<artifactId>spring-webmvc</artifactId>
<version>5.3.18</version>
</dependency>
<dependency>
<groupId>javax.servlet</groupId>
<artifactId>javax.servlet-api</artifactId>
<version>4.0.1</version>
</dependency>
</dependencies>
|
配置Maven插件
command启动命令: tomcat7:run
pom.xml1
2
3
4
5
6
7
8
9
10
11
12
13
14
|
<plugin>
<groupId>org.apache.tomcat.maven</groupId>
<artifactId>tomcat7-maven-plugin</artifactId>
<version>2.2</version>
<configuration>
<path>/admin</path>
<uriEncoding>UTF-8</uriEncoding>
<server>tomcat7</server>
</configuration>
</plugin>
|
pom.xml1
2
3
4
5
6
7
8
9
10
11
12
13
14
15
16
17
18
19
|
<plugin>
<groupId>org.eclipse.jetty</groupId>
<artifactId>jetty-maven-plugin</artifactId>
<version>9.4.45.v20220203</version>
<configuration>
<scanIntervalSeconds>10</scanIntervalSeconds>
<httpConnector>
<port>8080</port>
</httpConnector>
<webAppConfig>
<contextPath>/admin</contextPath>
</webAppConfig>
</configuration>
</plugin>
|
完整的pom.xml
pom.xml1
2
3
4
5
6
7
8
9
10
11
12
13
14
15
16
17
18
19
20
21
22
23
24
25
26
27
28
29
30
31
32
33
34
35
36
37
38
39
40
41
42
43
44
45
46
47
48
49
50
51
52
53
54
55
56
57
58
59
60
61
62
63
64
65
66
67
68
69
70
71
72
73
74
75
76
77
78
79
80
81
82
83
84
85
86
87
88
89
90
91
92
93
94
95
96
97
98
99
100
101
102
103
104
105
106
107
108
109
110
111
112
113
114
115
116
117
118
119
120
121
| <?xml version="1.0" encoding="UTF-8"?>
<project xmlns="http://maven.apache.org/POM/4.0.0" xmlns:xsi="http://www.w3.org/2001/XMLSchema-instance"
xsi:schemaLocation="http://maven.apache.org/POM/4.0.0 http://maven.apache.org/xsd/maven-4.0.0.xsd">
<modelVersion>4.0.0</modelVersion>
<groupId>org.example</groupId>
<artifactId>shsxt-spring-mvc-base</artifactId>
<version>1.0-SNAPSHOT</version>
<packaging>war</packaging>
<name>shsxt-spring-mvc-base Maven Webapp</name>
<url>http://www.example.com</url>
<properties>
<project.build.sourceEncoding>UTF-8</project.build.sourceEncoding>
<maven.compiler.source>1.8</maven.compiler.source>
<maven.compiler.target>1.8</maven.compiler.target>
</properties>
<dependencies>
<dependency>
<groupId>junit</groupId>
<artifactId>junit</artifactId>
<version>4.11</version>
<scope>test</scope>
</dependency>
<dependency>
<groupId>org.springframework</groupId>
<artifactId>spring-web</artifactId>
<version>5.3.18</version>
</dependency>
<dependency>
<groupId>org.springframework</groupId>
<artifactId>spring-webmvc</artifactId>
<version>5.3.18</version>
</dependency>
<dependency>
<groupId>javax.servlet</groupId>
<artifactId>javax.servlet-api</artifactId>
<version>4.0.1</version>
<scope>provided</scope>
</dependency>
</dependencies>
<build>
<finalName>shsxt-spring-mvc-base</finalName>
<pluginManagement>
<plugins>
<plugin>
<artifactId>maven-clean-plugin</artifactId>
<version>3.1.0</version>
</plugin>
<plugin>
<artifactId>maven-resources-plugin</artifactId>
<version>3.0.2</version>
</plugin>
<plugin>
<artifactId>maven-compiler-plugin</artifactId>
<version>3.8.0</version>
<configuration>
<source>1.8</source>
<target>1.8</target>
<encoding>utf-8</encoding>
</configuration>
</plugin>
<plugin>
<artifactId>maven-surefire-plugin</artifactId>
<version>2.22.1</version>
</plugin>
<plugin>
<artifactId>maven-war-plugin</artifactId>
<version>3.2.2</version>
</plugin>
<plugin>
<artifactId>maven-install-plugin</artifactId>
<version>2.5.2</version>
</plugin>
<plugin>
<artifactId>maven-deploy-plugin</artifactId>
<version>2.8.2</version>
</plugin>
<plugin>
<groupId>org.apache.tomcat.maven</groupId>
<artifactId>tomcat7-maven-plugin</artifactId>
<version>2.2</version>
<configuration>
<path>/admin</path>
<uriEncoding>UTF-8</uriEncoding>
<server>tomcat7</server>
</configuration>
</plugin>
<plugin>
<groupId>org.eclipse.jetty</groupId>
<artifactId>jetty-maven-plugin</artifactId>
<version>9.4.45.v20220203</version>
<configuration>
<scanIntervalSeconds>10</scanIntervalSeconds>
<httpConnector>
<port>8080</port>
</httpConnector>
<webAppConfig>
<contextPath>/admin</contextPath>
</webAppConfig>
</configuration>
</plugin>
</plugins>
</pluginManagement>
</build>
</project>
|
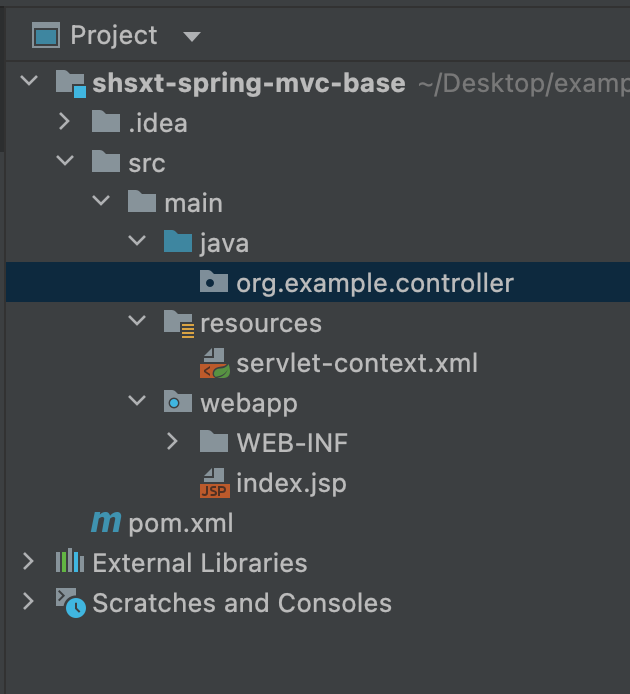
创建 servlet-context.xml
在 src/main/resources 资源目录下新建 servlet-context.xml 文件。
如果项目没有源代码目录,需要手动新建 java 源代码目录
servlet-context.xml1
2
3
4
5
6
7
8
9
10
11
12
13
14
15
16
17
18
19
20
21
22
23
24
25
26
27
28
29
| <?xml version="1.0" encoding="UTF-8"?>
<beans xmlns="http://www.springframework.org/schema/beans"
xmlns:xsi="http://www.w3.org/2001/XMLSchema-instance"
xmlns:mvc="http://www.springframework.org/schema/mvc"
xmlns:context="http://www.springframework.org/schema/context"
xsi:schemaLocation="http://www.springframework.org/schema/beans
https://www.springframework.org/schema/beans/spring-beans.xsd
http://www.springframework.org/schema/mvc
https://www.springframework.org/schema/mvc/spring-mvc.xsd
http://www.springframework.org/schema/context
https://www.springframework.org/schema/context/spring-context.xsd">
<context:component-scan base-package="org.example.controller"/>
<mvc:default-servlet-handler />
<mvc:annotation-driven />
<bean class="org.springframework.web.servlet.view.InternalResourceViewResolver" id="internalResourceViewResolver">
<property name="prefix" value="/WEB-INF/jsp/"/>
<property name="suffix" value=".jsp"/>
</bean>
</beans>
|
配置 web.xml
web.xml1
2
3
4
5
6
7
8
9
10
11
12
13
14
15
16
17
18
19
20
21
22
23
24
25
26
27
28
29
30
31
32
33
34
35
36
37
38
39
40
41
42
43
44
45
46
| <!DOCTYPE web-app PUBLIC
"-//Sun Microsystems, Inc.//DTD Web Application 2.3//EN"
"http://java.sun.com/dtd/web-app_2_3.dtd" >
<web-app version="3.0"
xmlns="http://java.sun.com/xml/ns/javaee"
xmlns:xsi="http://www.w3.org/2001/XMLSchema-instance"
xsi:schemaLocation="http://java.sun.com/xml/ns/javaee http://java.sun.com/xml/ns/javaee/web-app_3_0.xsd">
<display-name>Archetype Created Web Application</display-name>
<filter>
<filter-name>encodingFilter</filter-name>
<filter-class>org.springframework.web.filter.CharacterEncodingFilter</filter-class>
<init-param>
<param-name>encoding</param-name>
<param-value>UTF-8</param-value>
</init-param>
</filter>
<filter-mapping>
<filter-name>encodingFilter</filter-name>
<url-pattern>/*</url-pattern>
</filter-mapping>
<servlet>
<servlet-name>springMvc</servlet-name>
<servlet-class>org.springframework.web.servlet.DispatcherServlet</servlet-class>
<init-param>
<param-name>contextConfigLocation</param-name>
<param-value>classpath:servlet-context.xml</param-value>
</init-param>
<load-on-startup>1</load-on-startup>
</servlet>
<servlet-mapping>
<servlet-name>springMvc</servlet-name>
<url-pattern>/</url-pattern>
</servlet-mapping>
</web-app>
|
添加控制器
1
2
3
4
5
6
7
8
9
10
11
12
13
14
15
16
17
18
19
20
21
22
23
24
25
26
27
28
29
| package org.example.controller;
import org.springframework.stereotype.Controller;
import org.springframework.web.bind.annotation.RequestMapping;
import org.springframework.web.servlet.ModelAndView;
@Controller
public class HelloController {
@RequestMapping("hello")
public ModelAndView hello(){
ModelAndView modelAndView = new ModelAndView();
modelAndView.addObject("msg", "hello my world !!!");
modelAndView.setViewName("hello");
return modelAndView;
}
}
|
添加视图页面
1
2
3
4
5
6
7
8
9
10
11
12
13
14
15
16
17
| <%--
Created by IntelliJ IDEA.
User: haight
Date: 2022/4/7
Time: 11:00 AM
To change this template use File | Settings | File Templates.
--%>
<%@ page contentType="text/html;charset=UTF-8" language="java" %>
<html>
<head>
<title>Hello</title>
</head>
<body>
<%-- 通过el表达式获取 ModelAndView 中的数据 --%>
<h2>${msg}</h2>
</body>
</html>
|
启动 服务器
- tomcat7 idea 配置Run/Debug,Run命令为
tomcat7:run
- jetty idea 配置Run/Debug,Run命令为
jetty:run
地址映射
映射单个地址 @RequestMapping("user") 或 @RequestMapping("/user") , 注意,地址前加不加斜杠都一样。访问地址是 http://localhost:8080/user
映射多个路径, 可以使用数组配置多个路径映射 @RequstMapping(value = {"user","users","u"}) 或 @RequstMapping({"user","users","u"})
设置类路径,在类上使用 @RequestMapping 设置这个类的基础路径(方法路径前需要加上类路径)。
1
2
3
4
5
6
7
8
| @RequestMapping("users")
public class UserController{
@RequestMapping("list")
public void index(){
}
}
|
访问地址是 http://localhost:8080/users/list
请求方式 @RequestMapping 注解可以使用 method 属性设置 (GET | POST | PUT | DELETE 等),如 @RequestMappging(value="", method = ReqeustMethod.GET)
参数路径 路径上可以设置参数
http://localhost:8080/user?id=1 “id” 是路径中的一个参数, 使用方法如下
1
2
3
4
5
6
7
| public class UserController{
@RequestMapping(value = "user")
public void getUserById(String id){
}
}
|
或者使用参数注解 @RequestParam
1
2
3
4
5
6
7
| public class UserController{
@RequestMapping(value = "user")
public void getUserById(@RequestParam String id){
}
}
|
http://localhost:8080/user/1 “1” 是路径中的一个参数, 使用方法如下
1
2
3
4
5
6
7
| public class UserController{
@RequestMapping("user/{id}")
public void getUserById(@PathVariable("id") String id){
}
}
|
URL参数绑定
基本数据类型
传递的参数名与方法的形参名称保持一致
如果参数未传递或参数值为null,系统会报500错误
可以通过注解 @RequestParam 设置参数的默认值,可以解决参数为空的问题
1
2
3
| public void test(@RequestParam(defaultValue = 0) int id){
}
|
如果参数名和方法形参名称不一致, 可以通过注解 @RequestParam 设置 name 属性指定参数的名称
1
2
3
4
|
public void test(@RequestParam(name = "uid") int id){
}
|
包装类型
- 传递的参数名与方法的形参名称保持一致
- 如果参数未传递,默认值为
null
- 参数类型建议使用 包装类型 防止500错误
数组类型
JavaBean对象(实体类)
参数名与实体类的属性名称保持一致
1
2
3
4
5
6
7
8
9
10
11
12
13
14
15
16
17
18
19
20
21
22
| package org.example.po;
publci class User{
private Integer userId;
private String userName;
public Integer getUserId(){
return userId;
}
public void setUserId(Integer userId){
this.userId = userId;
}
public String getUserName(){
return userName;
}
public void setUserName(String userName){
this.userName = userName;
}
}
|
url传递参数,如 http://localhost:8080/user?userId=11&userName=wang
1
2
|
public void test(User user){}
|
List类型
对于集合的绑定,一般需要使用JavaBean对象进行包装
如 User 是一个JavaBean对象,有个 集合类型 的属性 phones
1
2
3
4
5
6
7
8
9
10
11
12
13
14
15
16
17
18
19
20
21
22
23
24
25
26
27
28
29
30
31
| package org.example.po;
publci class User{
private Integer userId;
private String userName;
public List<String> phones;
public Integer getUserId(){
return userId;
}
public void setUserId(Integer userId){
this.userId = userId;
}
public String getUserName(){
return userName;
}
public void setUserName(String userName){
this.userName = userName;
}
public List<String> getPhones(){
return phones;
}
public void setPhones(List<String> phones){
this.phones = phones;
}
}
|
jsp表单需要使用数组提交
1
2
3
4
5
| <form action="" method="post">
<input name="phones[0]" value="12111">
<input name="phones[1]" value="111111">
<button type="submit">Submit</button>
</form>
|
1
2
3
|
@RequestMappging(value="user",method=ReqeustMethod.POST)
public void test(User user){}
|
Map 类型
Map最为灵活,它也需要绑定在 JavaBean 对象上,而不能直接写在Controller方法的参数中。
请求转发与重定向
SpringMVC默认采用服务器内部转发的形式展示页面信息。请求转发地址栏的地址不会改变,重定向地址会改变。
请求转发
请求转发是在服务器内部进行转发,所以地址不会改变。
请求转发以 forward: 开头
1
2
3
4
5
6
7
8
9
10
11
12
13
14
15
16
17
18
19
20
21
22
23
24
25
26
27
28
29
30
| @RequestMapping("page1")
public void page1(){
ModelAndView modelAndView = nwe ModelAndView();
modelAndView.setViewName("page1");
return modelAndView;
}
@RequestMapping("page2")
public void page2(){
ModelAndView modelAndView = nwe ModelAndView();
modelAndView.setViewName("forward:page2.jsp");
return modelAndView;
}
@RequestMapping("page3")
public void page3(){
ModelAndView modelAndView = nwe ModelAndView();
modelAndView.setViewName("forward:page2.jsp?id=111");
return modelAndView;
}
@RequestMapping("page4")
public void page4(){
ModelAndView modelAndView = nwe ModelAndView();
modelAndView.setViewName("forward:page1");
return modelAndView;
}
|
重定向
重定向是否发一个302的状态码给浏览器,浏览器自己去请求跳转的页面,所以地址会改变。
重定向以 redirect: 开头,使用方法与转发相同。
请求域设置
- 使用 ModelAndView
- 使用 Model
- 使用 HttpServletRequest
- 使用 MoedlMap
- 使用 Map
Json数据开发
- @RespnseBody 该注解用于将Controller方法放回的对象,通过适当的 HttpMessageConverter 转换为指定格式后,写入到Response对象的 body 数据区。返回的数据不是 html,而是其它格式的数据,如json、xml。
- @RequestBody 该注解用于读取 Request 请求的 body 数据,使用系统默认配置的 HttpMessageConverter 进行解析。参数必须是一个Json格式的字符串
引入依赖
- jackson-core
- jackson-databind
- jackson-annotations
pom.xml1
2
3
4
5
6
7
8
9
10
11
12
13
14
15
| <dependency>
<groupId>com.fasterxml.jackson.core</groupId>
<artifactId>jackson-core</artifactId>
<version>2.13.2</version>
</dependency>
<dependency>
<groupId>com.fasterxml.jackson.core</groupId>
<artifactId>jackson-databind</artifactId>
<version>2.13.2.2</version>
</dependency>
<dependency>
<groupId>com.fasterxml.jackson.core</groupId>
<artifactId>jackson-annotations</artifactId>
<version>2.13.2</version>
</dependency>
|
修改配置文件
servlet-context.xml1
2
3
4
5
6
7
8
9
10
11
12
13
|
<mvc:annotation-driven>
<mvc:message-converters>
<bean class="org.springframework.http.converter.StringHttpMessageConverter">
<property name="defaultCharset" value="UTF-8"/>
</bean>
<bean class="org.springframework.http.converter.json.MappingJackson2HttpMessageConverter">
<property name="defaultCharset" value="UTF-8"/>
</bean>
</mvc:message-converters>
</mvc:annotation-driven>
|
注解使用
1
2
3
4
5
6
7
8
9
10
11
12
13
14
15
16
17
18
19
20
21
22
23
24
25
26
27
28
29
30
31
32
| package org.example.controller;
import org.example.po.User;
import org.springframework.stereotype.Controller;
import org.springframework.web.bind.annotation.RequestMapping;
import org.springframework.web.bind.annotation.ResponseBody;
@Controller
@RequestMapping("api")
public class ApiController {
@RequestMapping("getName")
@ResponseBody
public String getName(){
return "hello";
}
@RequestMapping("getObject")
@ResponseBody
public Object getObject(){
User result = new User("11", "LiSi");
return result;
}
}
|
拦截器
基本概念
SpringMVC 中的拦截器 Interceptor 主要作用是拦截用户请求进行处理(返回 true 则方向,否则返回 false ),如进行权限验证。定义拦截器有两种方法:
- 实现接口
org.springframework.web.servlet.HandlerInterceptor
- 继承适配器
org.springframework.web.servlet.HandlerInterceptorAdapter
实现接口
需要实现3个接口
- preHandle 在目标 Handler(方法)执行前 执行,返回true,执行目标方法,返回 false 阻止目标方法执行
- postHandle 在目标 Handler(方法)执行后,视图生成前 执行
- afterCompletion 在目标 Handler(方法)执行后,视图生成后 执行
1
2
3
4
5
6
7
8
9
10
11
12
13
14
15
16
17
18
19
20
21
22
23
24
25
26
27
28
29
30
| package org.example.interceptors;
import org.springframework.web.servlet.HandlerInterceptor;
import org.springframework.web.servlet.ModelAndView;
import javax.servlet.http.HttpServletRequest;
import javax.servlet.http.HttpServletResponse;
public class MyInterceptor implements HandlerInterceptor {
@Override
public boolean preHandle(HttpServletRequest request, HttpServletResponse response, Object handler) throws Exception {
System.out.println("目标方式执行之前");
return true;
}
@Override
public void postHandle(HttpServletRequest request, HttpServletResponse response, Object handler, ModelAndView modelAndView) throws Exception {
System.out.println("目标方式执行之后 视图生成前执行");
}
@Override
public void afterCompletion(HttpServletRequest request, HttpServletResponse response, Object handler, Exception ex) throws Exception {
System.out.println("目标方式执行之后 视图生成后执行");
}
}
|
继承适配器
已弃用,不建议使用。
拦截器配置
servlet-context.xml1
2
3
4
5
|
<mvc:interceptors>
<bean class="org.example.interceptors.MyInterceptor"/>
</mvc:interceptors>
|
servlet-context.xml1
2
3
4
5
6
7
8
9
10
|
<mvc:interceptors>
<mvc:interceptor>
<mvc:mapping path="/**"/>
<mvc:exclude-mapping path="/login/*"/>
<bean class="org.example.interceptors.MyInterceptor"/>
</mvc:interceptor>
</mvc:interceptors>
|
文件上传
环境配置
引入依赖
添加 commons-fileupload 依赖
pom.xml1
2
3
4
5
| <dependency>
<groupId>commons-fileupload</groupId>
<artifactId>commons-fileupload</artifactId>
<version>1.4</version>
</dependency>
|
修改Spring配置
servlet-context.xml1
2
3
4
5
6
7
8
9
10
11
12
|
<bean id="multipartResolver" class="org.springframework.web.multipart.commons.CommonsMultipartResolver">
<property name="maxUploadSize">
<value>104857600</value>
</property>
<property name="maxInMemorySize">
<value>4096</value>
</property>
</bean>
|
单文件上传
前台页面
文件上传表单页面
upload.jsp1
2
3
4
5
6
7
8
9
10
11
12
13
14
15
16
17
18
| <%--
Created by IntelliJ IDEA.
User: haight
Date: 2022/4/7
Time: 11:29 PM
To change this template use File | Settings | File Templates.
--%>
<%@ page contentType="text/html;charset=UTF-8" language="java" %>
<html>
<head>
<title>文件上传</title>
</head>
<body>
<form method="post" enctype="multipart/form-data" action="uploadFile">
文件:<input name="file" type="file" /> <button type="submit">上传</button>
</form>
</body>
</html>
|
文件上传结果页面
uploadResult.jsp1
2
3
4
5
6
7
8
9
10
11
12
13
14
15
16
| <%--
Created by IntelliJ IDEA.
User: haight
Date: 2022/4/7
Time: 11:32 PM
To change this template use File | Settings | File Templates.
--%>
<%@ page contentType="text/html;charset=UTF-8" language="java" %>
<html>
<head>
<title>上传文件结果</title>
</head>
<body>
<h2>${msg}</h2>
</body>
</html>
|
后台服务
方法一 使用 MultipartHttpServletRequest 获取文件信息
1
2
3
4
5
6
7
8
9
10
11
12
13
14
15
16
17
18
19
20
21
22
23
24
25
| package org.example.controller;
import org.springframework.stereotype.Controller;
import org.springframework.ui.Model;
import org.springframework.web.bind.annotation.PostMapping;
import org.springframework.web.multipart.MultipartFile;
import org.springframework.web.multipart.MultipartHttpServletRequest;
import javax.servlet.http.HttpServletRequest;
import java.io.File;
@Controller
public class UploadController {
@PostMapping("uploadFile")
public String uploadFile(HttpServletRequest request, Model model){
MultipartHttpServletRequest multipartHttpServletRequest = (MultipartHttpServletRequest) request;
MultipartFile multipartFile = multipartHttpServletRequest.getFile("file");
return "uploadResult";
}
}
|
方法二 使用注解获取文件信息
1
2
3
4
5
6
7
8
9
10
11
12
13
14
15
16
17
18
19
20
21
22
23
24
25
26
27
28
29
30
31
32
33
34
35
36
37
38
39
40
41
42
43
44
45
46
47
48
49
50
51
52
53
54
55
56
57
58
59
| package org.example.controller;
import org.springframework.stereotype.Controller;
import org.springframework.ui.Model;
import org.springframework.web.bind.annotation.PostMapping;
import org.springframework.web.bind.annotation.RequestParam;
import org.springframework.web.multipart.MultipartFile;
import javax.servlet.http.HttpServletRequest;
import java.io.File;
import java.io.IOException;
@Controller
public class UploadController {
@PostMapping("uploadFile")
public String uploadFile(HttpServletRequest request, @RequestParam("file") MultipartFile file, Model model){
if(file.isEmpty()){
model.addAttribute("msg","上次文件不能为空");
return "uploadResult";
}
String realPath = request.getServletContext().getRealPath("/");
File filePath = new File(realPath + "/upload");
if(!filePath.exists()){
filePath.mkdir();
}
String originalFilename = file.getOriginalFilename();
String siffx = originalFilename.substring(originalFilename.lastIndexOf("."));
String fileName = System.currentTimeMillis() + siffx;
try{
file.transferTo(new File(filePath, fileName));
model.addAttribute("msg","上传文件成功");
} catch (IOException e) {
e.printStackTrace();
model.addAttribute("msg","上传文件失败");
}
return "uploadResult";
}
}
|
多文件上传
前台页面1
2
3
4
5
6
7
8
9
10
11
12
13
14
15
16
17
18
19
20
21
| <%--
Created by IntelliJ IDEA.
User: haight
Date: 2022/4/7
Time: 11:29 PM
To change this template use File | Settings | File Templates.
--%>
<%@ page contentType="text/html;charset=UTF-8" language="java" %>
<html>
<head>
<title>文件上传</title>
</head>
<body>
<form method="post" enctype="multipart/form-data" action="uploadFiles">
<div>文件:<input name="files" type="file" /></div>
<div>文件:<input name="files" type="file" /></div>
<div>文件:<input name="files" type="file" /></div>
<button type="submit">上传</button>
</form>
</body>
</html>
|
后台1
2
3
4
5
6
7
8
9
10
11
12
13
14
15
16
17
18
19
20
21
22
23
24
25
26
27
28
29
30
31
32
33
34
35
36
37
38
39
40
41
42
43
44
45
46
47
48
49
50
51
52
53
54
55
56
57
58
59
60
61
62
63
64
65
66
67
68
69
70
| package org.example.controller;
import org.springframework.stereotype.Controller;
import org.springframework.ui.Model;
import org.springframework.web.bind.annotation.PostMapping;
import org.springframework.web.bind.annotation.RequestParam;
import org.springframework.web.multipart.MultipartFile;
import javax.servlet.http.HttpServletRequest;
import java.io.File;
import java.io.IOException;
import java.util.List;
@Controller
public class MulUploadController {
@PostMapping("uploadFiles")
public String uploadFile(HttpServletRequest request, @RequestParam("files") List<MultipartFile> files, Model model){
if(files != null && files.size() > 0){
String realPath = request.getServletContext().getRealPath("/");
File filePath = new File(realPath + "/upload");
try{
for(MultipartFile file: files){
if(!file.isEmpty()){
saveFile(file, request, filePath);
}
}
model.addAttribute("msg", "上传文件成功");
}catch(Exception ex){
model.addAttribute("msg", "上传文件发生错误");
}
}
return "uploadResult";
}
private void saveFile(MultipartFile file, HttpServletRequest request, File filePath) throws IOException {
if(!filePath.exists()){
filePath.mkdir();
}
String originalFilename = file.getOriginalFilename();
String siffx = originalFilename.substring(originalFilename.lastIndexOf("."));
String fileName = System.currentTimeMillis() + siffx;
try{
file.transferTo(new File(filePath, fileName));
} catch (IOException e) {
e.printStackTrace();
throw e;
}
}
}
|
全局异常